
She also always brings me a treasure from her trip and this last summer she brought me a paper bead necklace. I love it for many reasons....1. She gave it to me...2. It's from Africa...3. The color!...4.Simplicity..5. I used to make paper beads as a little girl

I'm not a jewelry girl so I love how it doesn't feel like jewelry.
Paper beads are also made in Uganda and the sale of these necklaces help support women and their families through fair trade labor. You can purchase a necklace here to support these women. You can also read this blog to follow the journey of a woman who has dedicated her life to the Kingdom of Christ in the form of working with women, children and families in Uganda.
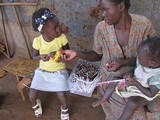

Pictures property of Amazima
Here is a little tutorial for paper bead making. You can use magazine paper or specifically choose scrapbook paper with a color or design you like.
Supplies:
Glue
Ruler
Scissors
Paper
Fishing line or Floss
Toothpick or long needle
Paper or magazine pages
Glass beads
Necklace eye and hook

You are going to take your sheet of paper, measure and mark long triangles on the backside of the print. If you mark on the pattern your bead will just end up the color of the mark. The size of the triangle will determine the size of the bead


Cut out each triangle.

Take a needle or a toothpick to roll the paper around. I used a needle because it makes a small, tight bead. Starting with the fat end of the paper roll tightly around needle.

Here's a video
When you come to the end of the paper place a line of glue on the tail of it and finish wrapping, working the glue into the roll and end.

Once you have completed all of the beads they need to be sealed. This can be done a number of ways. You can make a watered down solution of glue and water, use enamel or spray a high gloss clear coat. I strung my beads on some fishing line, hung them up outside and sprayed a few coats of clear gloss.


Let the beads dry for 24 hours before stringing them into a necklace.
To make the necklace I purchased glass beads for $2 at Wal-Mart along with necklace ends. I used floss for the necklace because the fishing line was to big for the glass beads. I placed two glass beads in between each paper bead.
Here is the finished product!

This would be a great activity to do with your children. You can teach them about the women and children in other countries that make these to provide for their families. They can make a necklace for themselves and purchase one to support those families. Little Boys find it fun to make the beads out of comic books and newspaper funnies.
Love it...and you used Amy Butler paper to top it off. Africa...craft...Amy Butler...purpose...ahhhhhh
Reply Deletejust curious.. what are the actual measurements for the round bead? it looks like 1/4 but i am not sure how long to make the paper. thanks!
Reply Deletethat didn't make sense! i mean it looks like it is 1/4 wide but how long is it? looks about 30". help! :-)
Reply Delete